ERR_PROXY_CERTIFICATE_INVALID When Using VPN: How to Fix it
Try our tested solutions to pair VPN software with Chrome browser
- Google Chrome is probably the most popular browser on the globe today.
- Using a VPN can easily improve your Chrome web browsing experience.
- However, sometimes the VPN may refuse to work with Google Chrome.
- If your VPN doesn't get along with Chrome, then our guide is definitely for you.
The main advantage of the full-spectrum VPN in comparison to a browser extension is the integration of all applications.
One VPN to bind them all, regardless if they’re browsers or some other tools like Spotify or Popcorn Time.
However, that integration might come in different shades of gray, as this case has shown. Namely, a lot of users experienced issues with Chrome, as Google’s browser just won’t work when paired with a VPN.
This can be a grave problem, especially for the majority of users who prefer Chrome over other browsers. Have in mind that these fixes refer to VPN solutions rather than extensions.
Some of the steps might come in handy, but don’t hold your hopes high. If you’re experiencing issues with VPN in Chrome, make sure to check the steps we provided for you. You can find them below.


Why VPN is not working in Chrome?
Usually, you can experience VPN issues on your browser due to different reasons such as an unstable Internet connection or cache data in your browser.
It’s possible that cached data stored in your browser interferes with your VPN client and thus blocks your server connection.
Different users complained about issues regarding VPN usage with the Google Chrome browser:
- Touch VPN not working chrome
- CyberGhost Chrome extension not working
- NordVPN Chrome extension not working
- PureVPN Chrome extension not working
- Browsec VPN not working
- Urban VPN Chrome not working
- err_proxy_certificate_invalid when using ZenMate
- Surfshark Chrome extension not working
- Tunnelbear Chrome extension not working
- Betternet VPN not working in Chrome
- VPN not working in incognito
- Hoxx VPN not working
That being said, using a VPN either as software or as an extension in the browser may generate problems, so follow us on solving this issue in Chrome.
What can I do if VPN isn’t working with Chrome?
1. Check the connection
- Restart your PC, router, and modem.
- Make sure your Wi-Fi is enabled. Also, try using LAN instead of Wi-Fi.
- Flush DNS:
- Open Command Prompt by right-clicking on the Start button.
- In the command line, type the following commands and press Enter after each:
- ipconfig /release
- ipconfig /renew
- After that, type in the following command and press Enter:
- ipconfig /flushdns
- Close the Command line and look for changes.
- Reset your Power settings to default.
- Reset router to factory settings.
Before we proceed with the troubleshooting of VPN and Chrome respectively, let’s make sure that your connection is working as intended.
The underlying connection can and will occasionally be a problem, especially in Windows 10 which tends to break the connection with every new update.
There are various ways to confirm whether your overall connection is malfunctioning or the issue is closely associated with Chrome and VPN.
For starters, try running Chrome without the VPN. If the problem is persistent, even with an alternative browser, we advise you to try one of these steps and look for improvements:
2. Connect to a better VPN
First things first – choosing the right VPN can make all the difference. Why look for ways to repair Google Chrome and VPN issues when you can simply avoid them in the first place?
Our recommendation goes to PIA (Private Internet Access), a trusted VPN client perfectly suited to seamlessly blend in with Chrome.
Browser friendly, the PIA VPN really has unmatched leverage when it comes to your safety on the web.
But it does not just secure your browser, it extends its protection to all your apps thanks to the TCP/IP interface level.
This leading VPN provider relies on tunneling technology to provide multi-layered security, which basically means that it uses encrypted tunnels to create multiple layers of privacy around you.
Besides its massive network of worldwide servers, the service is your number 1 choice for confidentiality thanks to its strict zero-logs policy.
It might also be worth mentioning that these advanced features are packed in a very intuitive and easy-to-use interface allowing you to connect your VPN client with just one click, literally.
Private Internet Access
Match PIA with Google Chrome to browse anonymously and have reliable privacy online.3. Change servers

VPN-wise, the best thing you can do when the issues suddenly emerge is to subtly change the server.
Most free and every premium VPN solution offer a large variety of servers positioned all around the world.
So, if you’re experiencing issues with one server, there’s a good chance that the alternative one will resolve the halt.
Some of the most used ones tend to get overcrowded, while there’s also a possibility of temporary server failure.
The procedure is rather simple on all available VPNs, so you should have an easy time switching back and forth between the available servers.
On the other hand, in case you’re still stuck with the same issues and unable to connect through VPN and use Chrome in a seamless manner, make sure to check the additional steps we provided below.
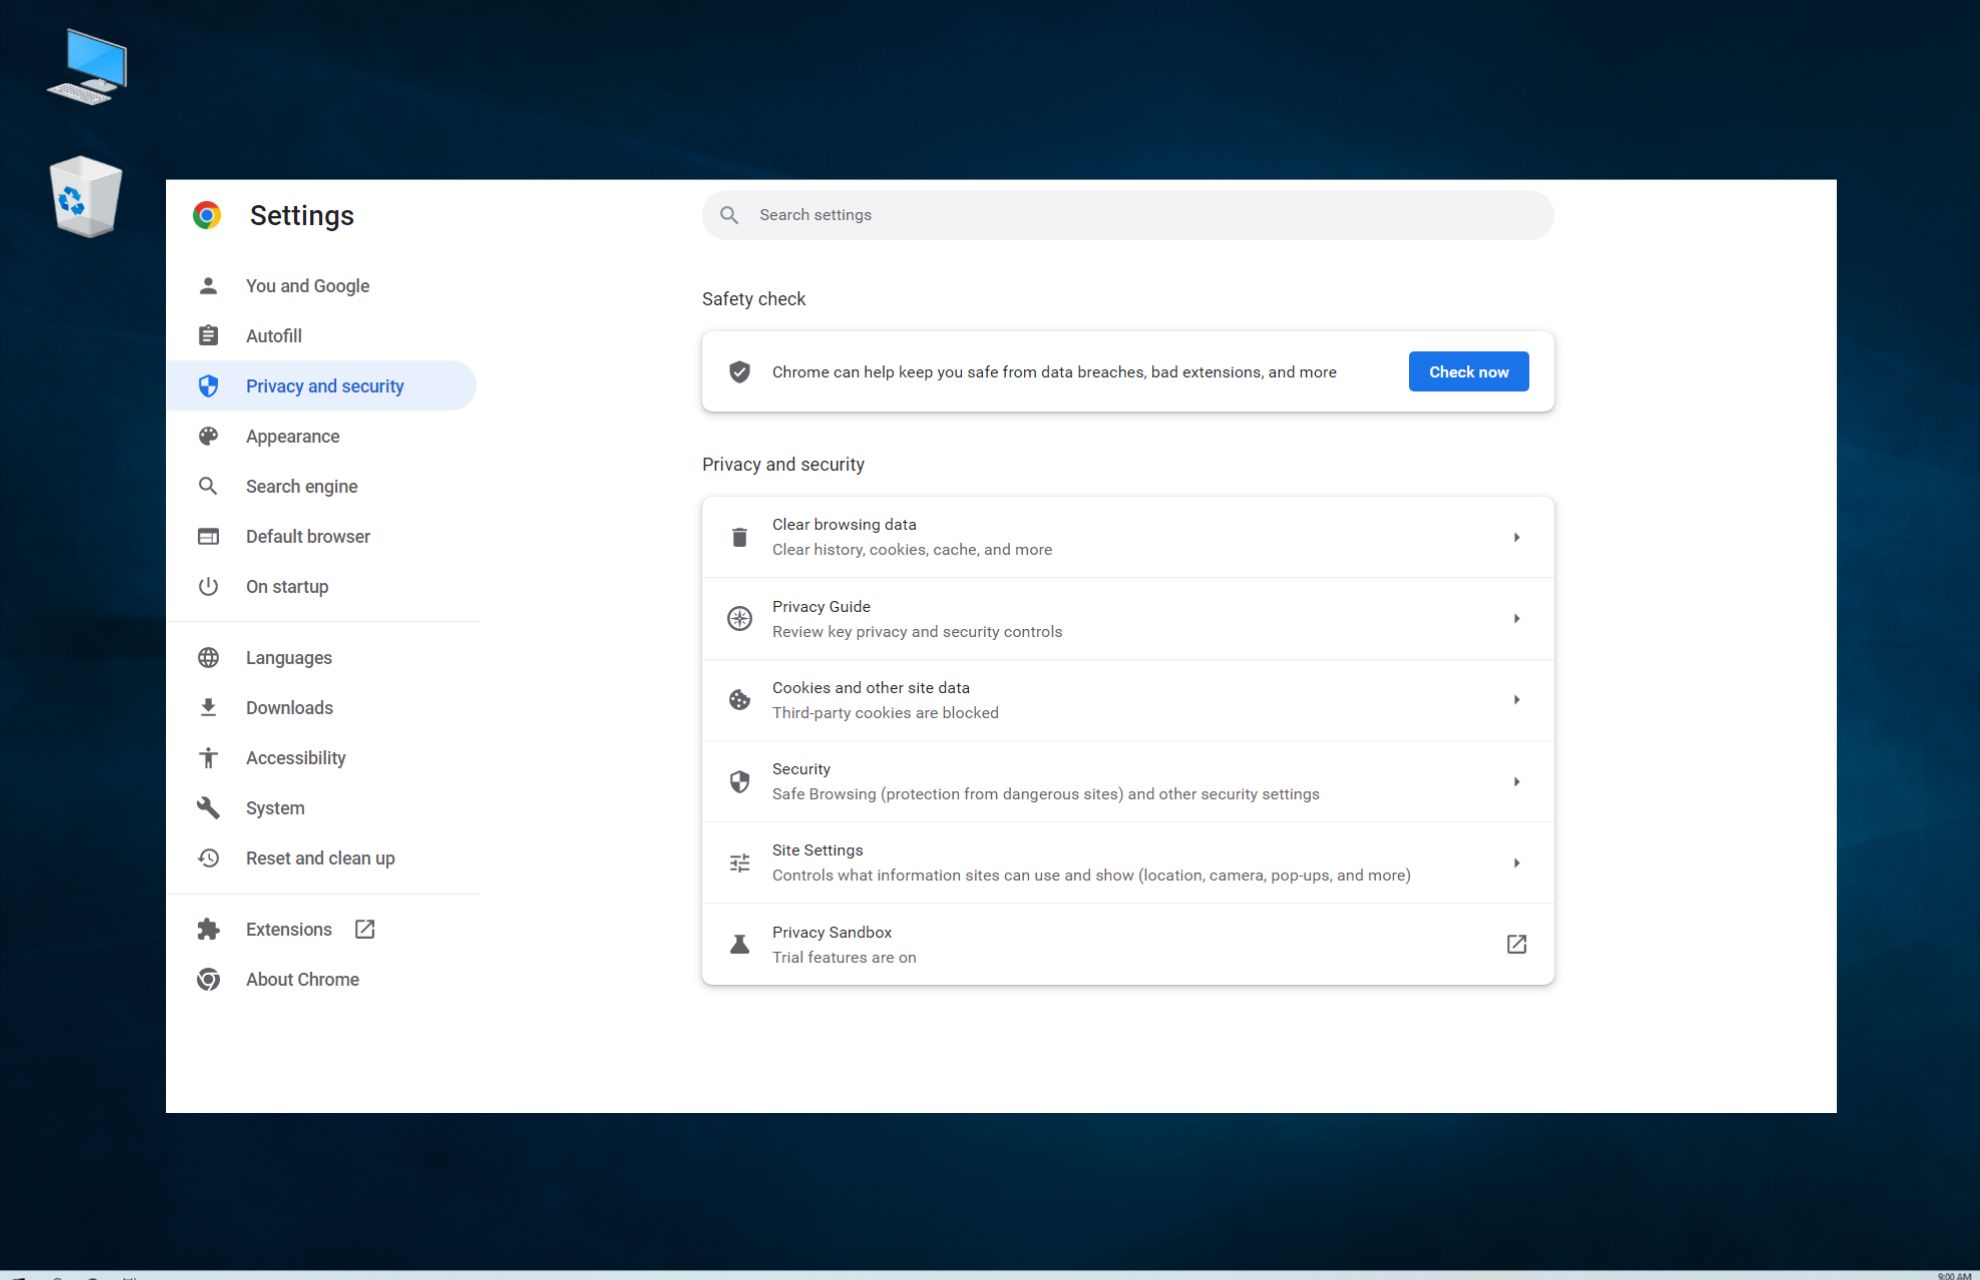
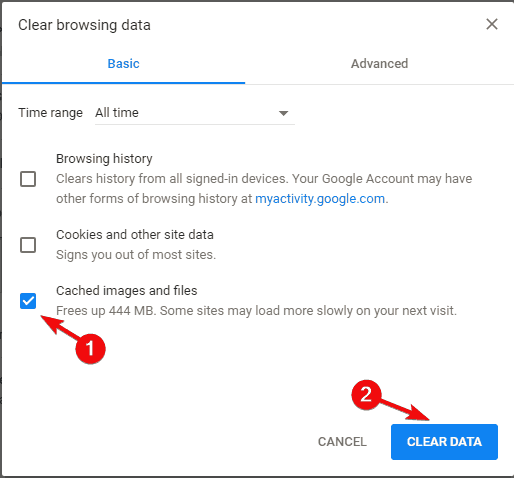
4. Clear Chrome’s browsing data
- Open Chrome and press Ctrl + Shift + Delete to open the Clear browsing data menu.
- Check the Cached images and files box.
- Click on the Clear Data button.

- Close Chrome, re-enable VPN, and try connecting again.
Like any other browser, Chrome will accumulate large chunks of data in order to speed up the browsing experience and preserve your history.
However, pilling up the cache and cookies will lead, more times than not, to slowdowns. Also, it might affect VPN integration and even prevent the connection through the secure tunnel.
In order to avoid this, we recommend clearing your cache and moving from there. Of course, make sure to preserve your passwords or write them down. Here’s how to clear the browsing data on Chrome:
5. Disable Chrome proxy
- Open Chrome.
- Click on the 3-dot menu and open Settings.
- Scroll down and expand the Advanced options section.

- Scroll to the bottom and click on Open proxy settings under the System section.
- Select LAN settings.

- Uncheck Automatically detect settings.
- Uncheck the Use the proxy server for your LAN box.

- Confirm changes and run your VPN and then Chrome.
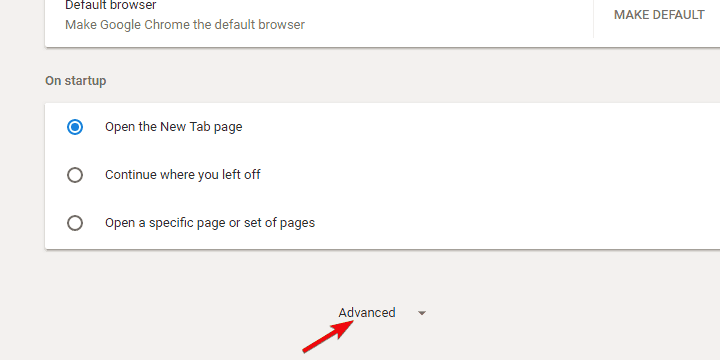

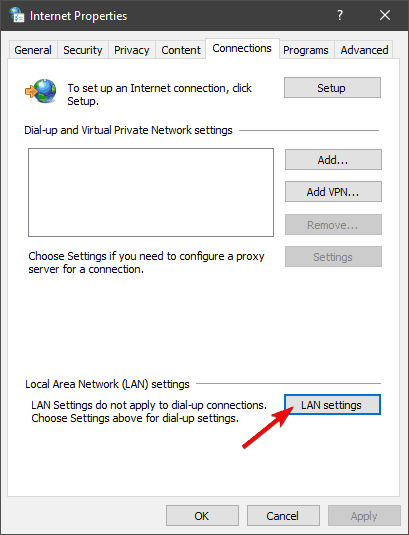
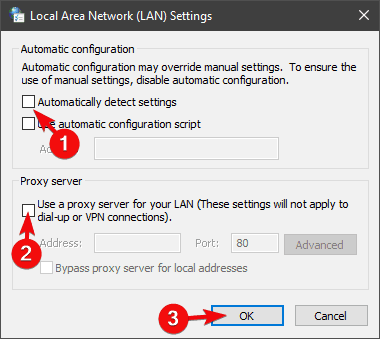
If you’ve configured a proxy server on Chrome or it’s automatically configured, we advise you to turn it off. Proxy server and VPN are not on the good terms as one tends to block the other.
Also, it’s advised to disable the proxy extensions (they mostly are advertised as VPNs which they’re not in a true sense of the word) if you use a desktop client VPN.
Follow these instructions to disable Chrome proxy:
Proxy server issues are pretty annoying. Make them a thing of the past with the help of this guide.
These steps should show you how to disable Chrome extensions:
- Open Chrome.
- Under the 3-dot menu, select More tools and then Extensions.
- Remove all proxy-related privacy extensions and restart Chrome.
6. Reconfigure DNS
Instead of the automatically generated DNS, you can try and apply general Google DNS. Follow these steps to reconfigure DNS on your PC:
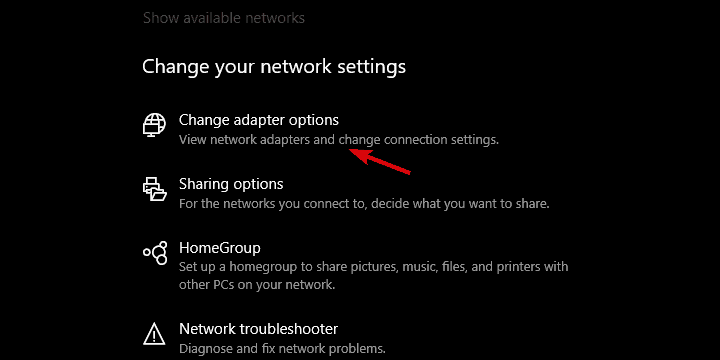
- Right-click on the Connection icon placed on Taskbar and open Network & Internet settings.
- Click on the Change adapter options.
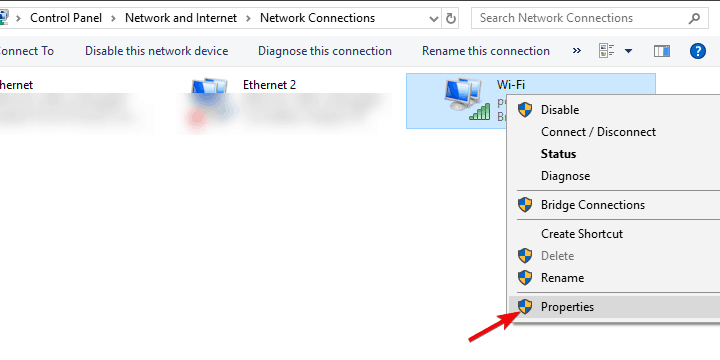
- Right-click on your default connection adapter and open Properties.
- Highlight Internet Protocol Version 4 (TCP/IPv4) and click Properties.

- Mark Use the following DNS server addresses.
- Under the Preferred DNS server, insert 8.8.8.8.
- Under the Alternate DNS server, insert 8.8.4.4.

- Confirm changes and close Adapter settings.
- Navigate to VPN settings and make sure to enable VPN to change DNS settings only when in use.
- Restart your PC and look for changes.

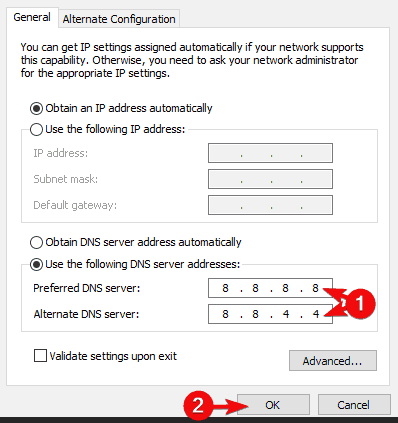
Usually, everything works fine with the automatic acquisition of the IP address, but it’s worth a shot to try and change it.
Also, this action, in combination with the VPN’s own reconfiguring, resolved issues for a lot of users.
DNS server is not responding on Windows 10? Don’t worry, we’ve got the right solution for you.
7. Disable antivirus temporarily
Here’s how to do it in a few simple steps:
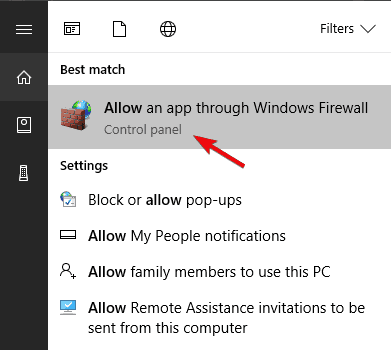
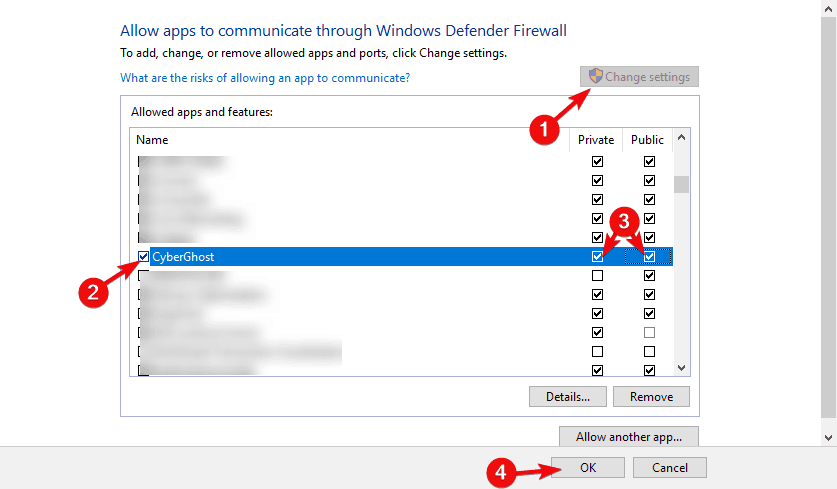
- In the Windows Search bar, type Allow and select Allow an app through Windows Firewall.

- Click on the Change settings button.
- Find your VPN on the list and check the box beside it. Also, make sure that both Public and Private networks are enabled.

- Confirm changes and try connecting through the VPN again.
Antivirus solutions went a long way from simple anti-malware solutions. Nowadays, they come in suits, with all kinds of system monitoring and optimization tools and, foremost, third-party firewalls.
Those can come in handy, especially if you need an extra layer of online security.
However, they also tend to block various connection-dependent services and their subsidiaries. In this case, they might block your VPN and thus prevent internet access through Chrome.
In order to resolve this, you can disable them permanently or whitelist the VPN and Chrome.
This procedure differentiates various solutions, so we advise you to check your VPN’s support website for detailed insight.
Also, you should check the Windows-native Firewall and create an exception for the VPN at hand.
8. Reinstall Chrome and VPN
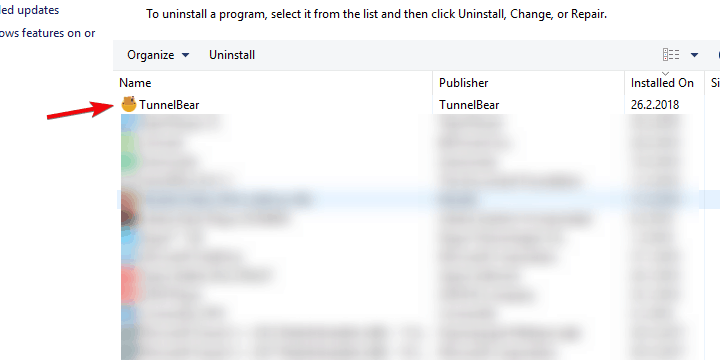
- In the Windows Search bar, type Control and open Control Panel from the list of results.
- From the Category view, click Uninstall a program under Programs.
- Right-click on your VPN solution and Uninstall it.
Finally, if none of the previous solutions helped you, you can try and reinstall both Chrome and VPN and move from there.
Both applications can be affected by various changes in the Windows ecosystem, making them quite prone to errors inflicted by updates.
For that reason, we recommend a clean reinstallation as the last resort in this matter.
If you’re not sure how to completely uninstall Chrome and VPN, follow the instructions we provided below:
VPNs, like any other software, are sometimes vulnerable to flaws that prevent you from removing the VPN connection from your PC.
Since this may happen, in order to completely uninstall the utility from your PC, you may need to do many actions, as many VPN providers leave files behind.
We recommend using CCleaner third-party uninstaller to clean all remaining files and registry entries the VPN has made, and restart your PC.
After the uninstallation is complete with no remnant files, download the latest version of the VPN of your choice and install it.
That should do it. Don’t forget to send a ticket to your VPN provider if the issue is persistent. The price of the package includes support, so make sure to ask for a resolution from the responsible providers.
In case you have an alternative solution we forgot to enlist or question regarding the ones we enlisted, feel free to share it with us. You can do so in the comments section below.
